

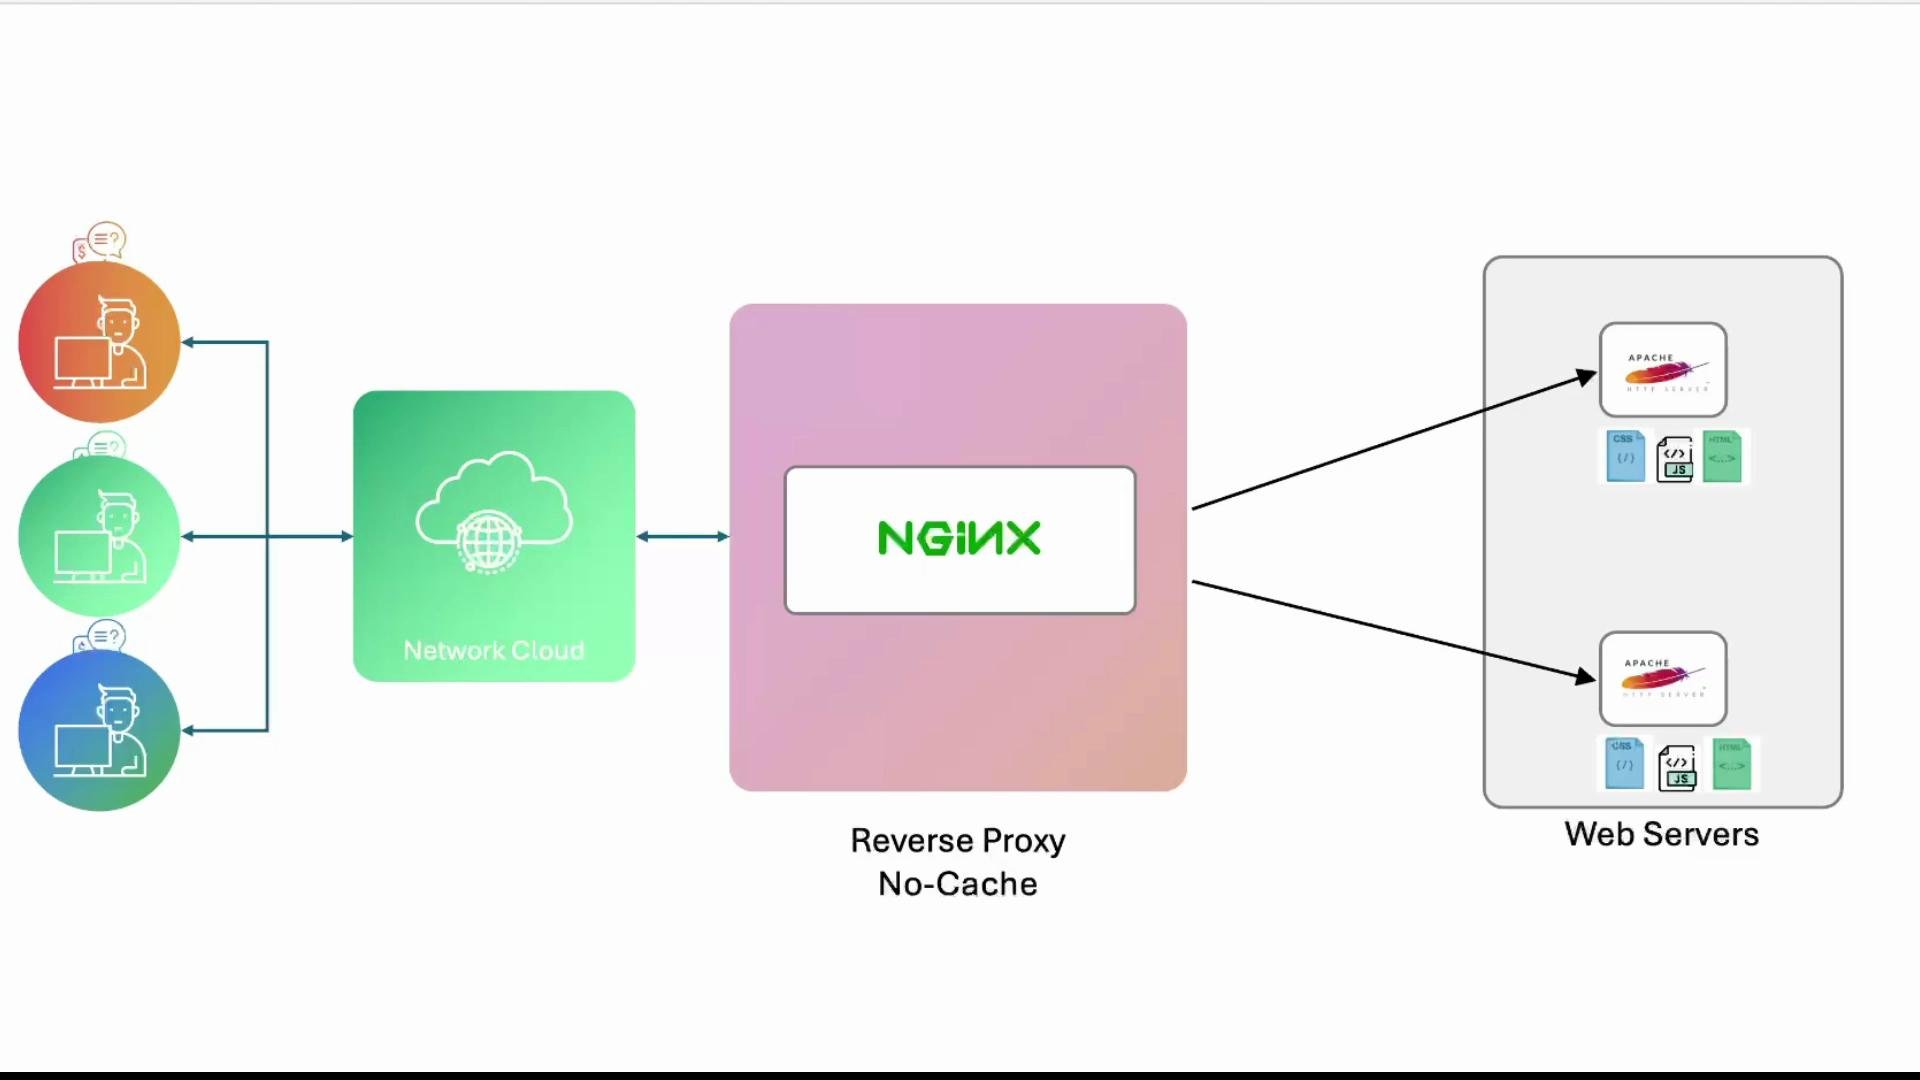
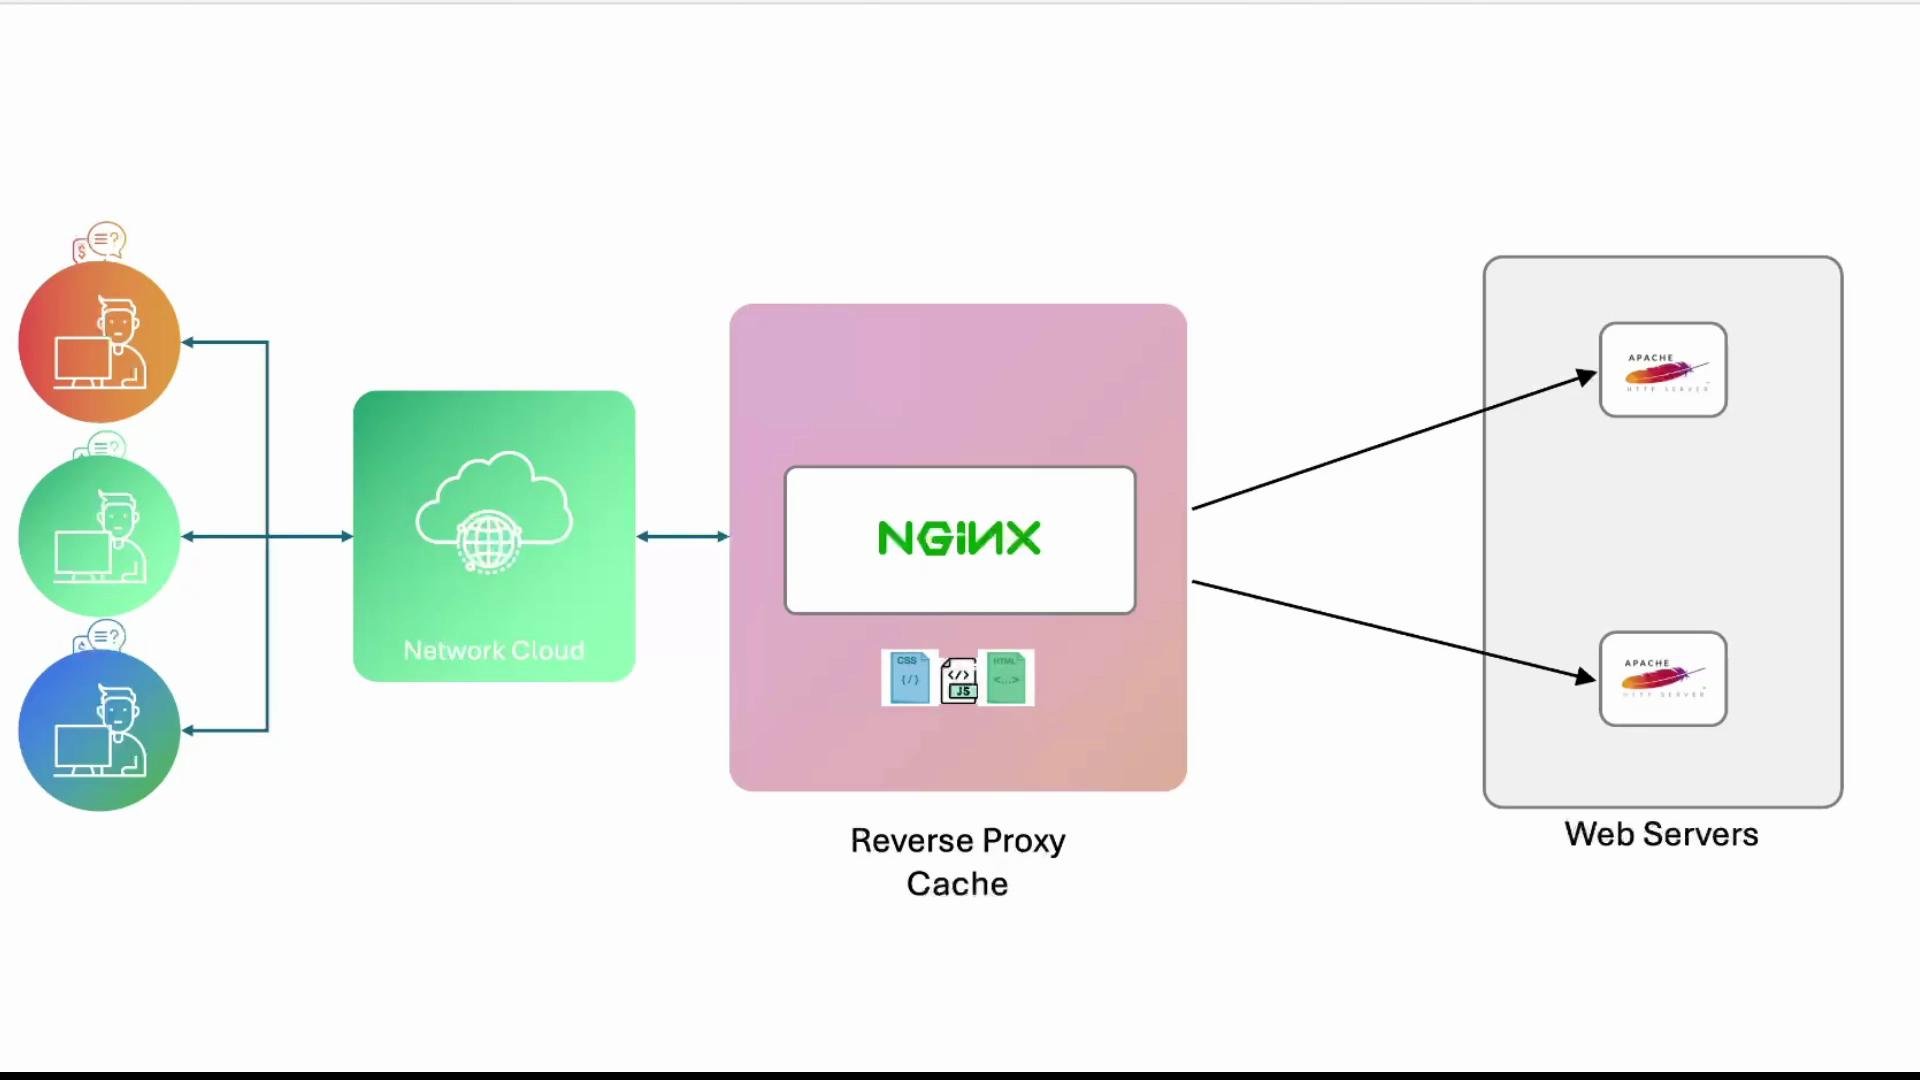
1 — Inspect backend activity (no cache)
Tail the Apache access logs on a backend while you load the site from a client. This confirms that the origin receives every request before we enable proxy caching.Browser caching (Cache-Control, Expires) is client-side. NGINX proxy caching sits between clients and the origin and lets many clients get responses without hitting the origin for each request.
2 — Make the demo results more visible
To make cache hits obvious, increase the size of a few static files on the backends so that repeating origin requests are large and easy to spot:3 — Configure NGINX disk cache (global settings)
Add a global cache path and defaults in the main NGINX config (commonly/etc/nginx/nginx.conf) — this must be outside any http, server, or location blocks:
levels=1:2splits the cache into subdirectories for filesystem performance.keys_zone=app_cache:10mreserves memory to store cache keys (adjust as traffic grows).proxy_cache_keycomposes the cache lookup key — include scheme, method, host, and URI to avoid collisions.
www-data):
Monitor disk usage and cache size. A misconfigured cache or too large TTLs can quickly consume disk space. Plan eviction policies and sizing for production.
4 — Enable proxy cache in the site/server config
Edit your site config (for example/etc/nginx/sites-available/example-https) and enable proxy_cache for the proxied location(s). Optionally add Cache-Control to responses for browser caching.
Example server block (showing the relevant parts):
upstream block exists and matches your backends and ports:
5 — Add a log field on Apache to show upstream cache status
To make verification straightforward, have Apache log theX-Proxy-Cache header sent by NGINX. Add or update a LogFormat in /etc/apache2/apache2.conf or in your vhost:
"MISS" in the Apache logs for the first fetch; subsequent requests served from the cache will not reach Apache (they will not generate HIT entries in origin logs).
6 — Verify caching behavior
Follow these checks to confirm caching is working:- Confirm the cache directory is initially empty or minimal:
- Trigger traffic (open the site or use curl). Initially NGINX will fetch items and create cache files. Example curl to show headers:
X-Proxy-Cache: MISS on the first request when you included proxy_set_header X-Proxy-Cache $upstream_cache_status;.
- Inspect the NGINX cache directory — it should contain subdirectories and cached object files:
- Tail the NGINX access log to observe cached responses being served. Cached responses may show status
200(full) or206(partial) depending on client ranged requests:
- Re-open the site or use a new browser session/Incognito. The Apache backend logs should show fewer repeated requests for large assets; NGINX will be serving them from cache. When Apache does see requests, the
X-Proxy-Cachefield will typically show"MISS"for the first fetch and not appear for subsequent HITs (because the origin is not contacted).
proxy_set_header X-Proxy-Cache $upstream_cache_status; and Apache’s LogFormat captures it (%{X-Proxy-Cache}i), you’ll see whether requests were MISS, HIT, EXPIRED, or REVALIDATED.
DevTools verification
Open Browser Developer Tools → Network and inspect response headers and sizes. You should see large resource sizes (we made them large for the demo), but after the cache warms, repeated loads should not cause new origin hits. NGINX will serve cached responses, reducing backend load.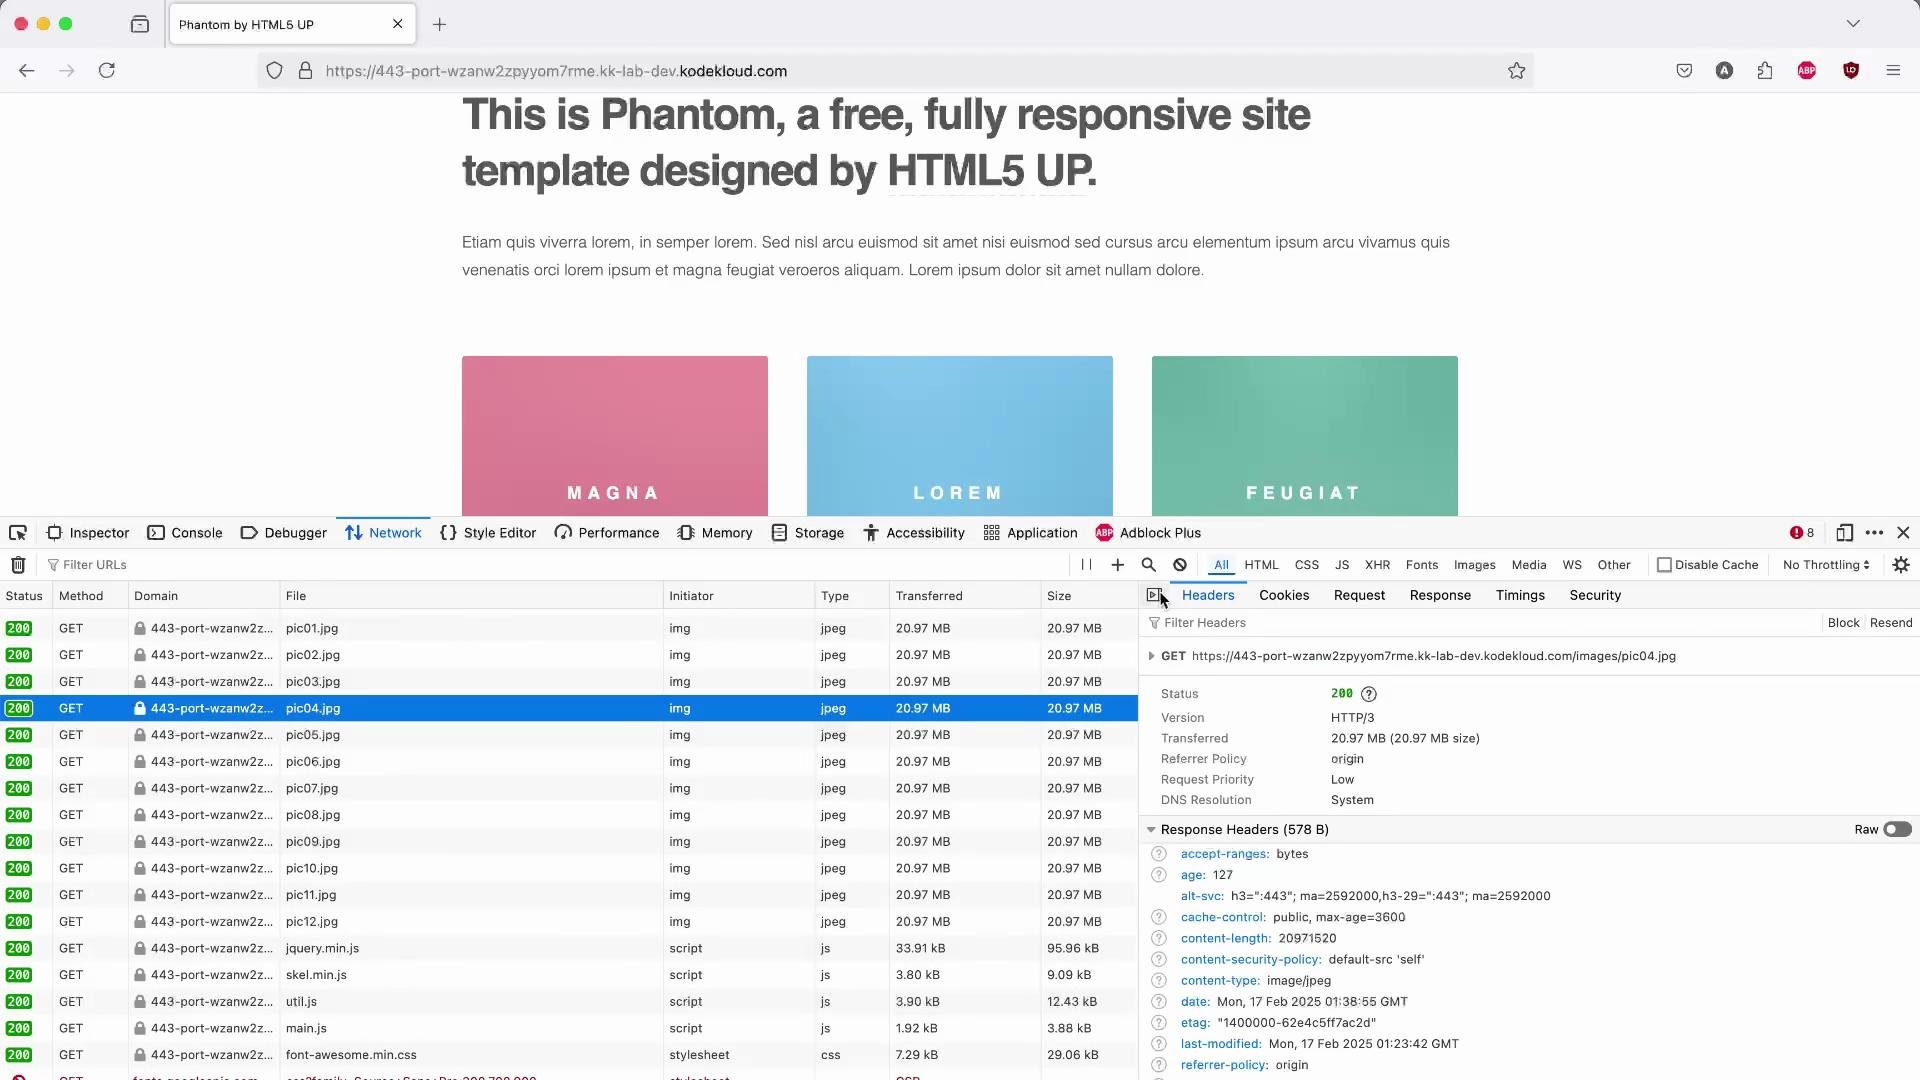
Quick reference: cache settings
Summary & next steps
- Without proxy caching, each client request hits Apache and the origin bears the full response cost.
- We configured a disk cache with
proxy_cache_path, set a cache key, and declared TTLs withproxy_cache_valid. - We enabled
proxy_cachein the proxied location and forwarded$upstream_cache_statusto the origin for visibility. - After the cache warms (first requests = MISS), subsequent requests are served by NGINX (HIT) and origins are spared repeated heavy responses.
Links and references
- NGINX proxy_cache documentation: https://nginx.org/en/docs/http/ngx_http_proxy_module.html#proxy_cache
- NGINX caching guide: https://nginx.org/en/docs/http/ngx_http_proxy_module.html
- Apache logging docs: https://httpd.apache.org/docs/current/logs.html
- Browser DevTools Network panel: https://developer.chrome.com/docs/devtools/network/