

- Detecting representation and label disparities early prevents biased behavior from being learned and amplified by models.
- Clarify integrates into the data preparation workflow in Data Wrangler, letting you inspect, mitigate, and re-evaluate bias without leaving the visual flow.
- In the AWS console, open Amazon SageMaker: https://learn.kodekloud.com/user/courses/aws-sagemaker.
- Under Applications, open Canvas.
- From Canvas, launch Data Wrangler and create a new data flow. For this demo, we start from a Canvas dataset containing the Titanic data (import completed successfully).
- Verify your dataset’s column types (numerical vs categorical) and clean any parsing issues before running the analysis.
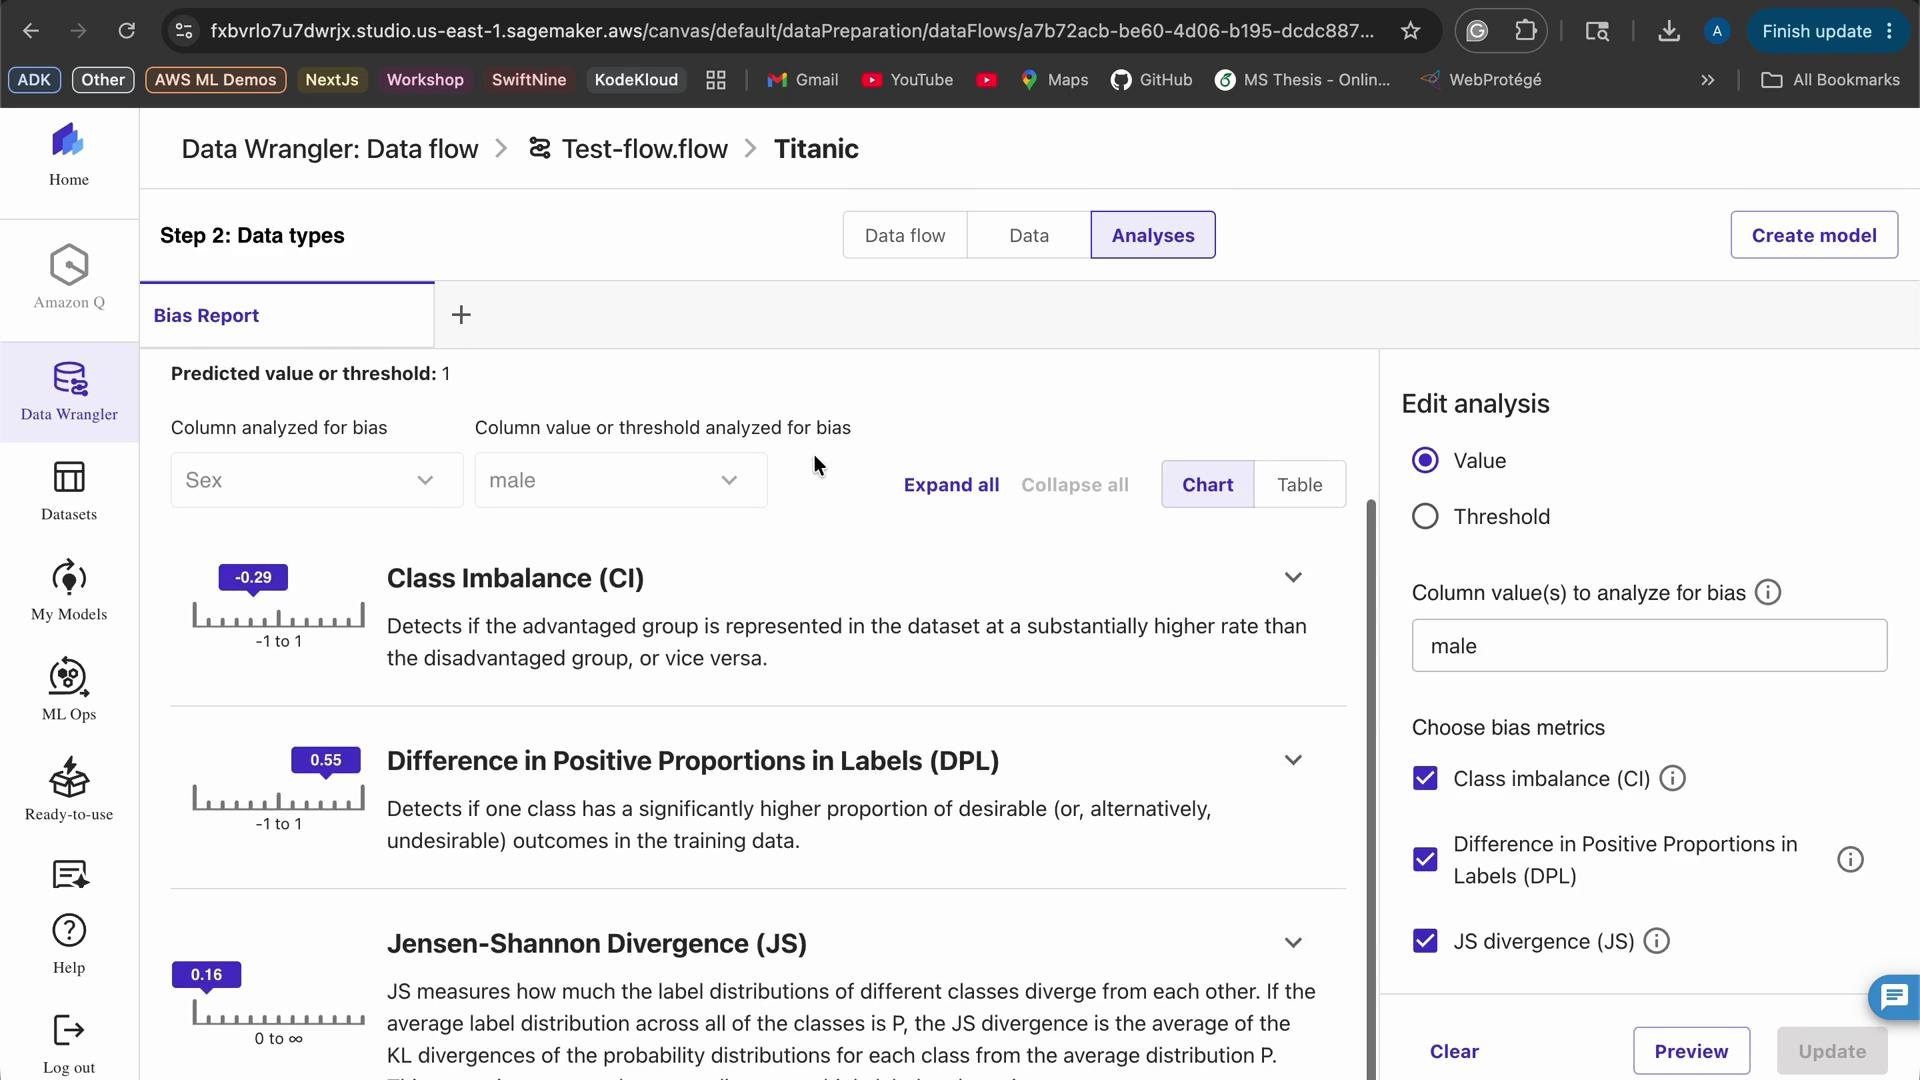
- In Data Wrangler, open the Analysis section and choose the Bias report (SageMaker Clarify).
- Choose the label (the column your model predicts):
survived.- Set the label value indicating the positive outcome to
1(survived =1).
- Set the label value indicating the positive outcome to
- Choose the sensitive attribute (the column to analyze for bias):
sex.- Set the attribute value to analyze (for example,
male) — Clarify will compare this group against the remainder of the dataset (the reference group).
- Set the attribute value to analyze (for example,
- Optionally configure mitigation options (oversampling or undersampling) to rebalance the dataset automatically after the imbalance is identified.
Practical mitigation workflows
- Oversampling: Increase the number of records for the under-represented group by duplicating samples or synthetically generating new ones. This raises the group’s presence and can reduce CI and DPL.
- Undersampling: Reduce the number of records from an over-represented group. This simplifies class balance but may remove informative samples—use cautiously.
- Re-labeling and data-quality fixes: If disparities are due to label errors or historical bias in labeling, correct labels or adjust features that encode biased signals.
- Re-run Clarify: After any mitigation, re-run the bias analysis inside Data Wrangler to quantify the effect on CI, DPL, and JS.
- Confirm column types and missing-value handling for the features used in Clarify.
- Validate that the chosen sensitive attribute and reference groups match your fairness goals (e.g.,
sex,race,agebuckets). - Monitor how mitigation affects downstream model performance (accuracy, precision/recall) and fairness metrics simultaneously.
- Verify dataset imports and column types in Data Wrangler.
- Select
survivedas label and set positive label =1. - Select sensitive attribute
sexand choose the group to analyze (e.g.,male). - Inspect CI, DPL, JS in Clarify report.
- Apply oversampling/undersampling or data fixes if needed.
- Re-run Clarify and compare metrics.
- Proceed to model training only after acceptable parity is achieved or mitigation is documented.
- If you detect meaningful imbalance or disparate outcomes, apply mitigation techniques in Data Wrangler (oversampling/undersampling) and re-run the Clarify analysis to validate improvements.
- Use bias analysis as a standard gating step before training models to avoid amplifying dataset imbalances in production.
Always analyze your training dataset for representation and label disparities before proceeding to model training. Small corrections to class balance and label proportions can significantly reduce biased model behavior downstream.
- Amazon SageMaker — KodeKloud course page
- SageMaker Clarify documentation (AWS): https://docs.aws.amazon.com/sagemaker/latest/dg/clarify.html
- Data Wrangler overview (AWS): https://docs.aws.amazon.com/sagemaker/latest/dg/data-wrangler.html