

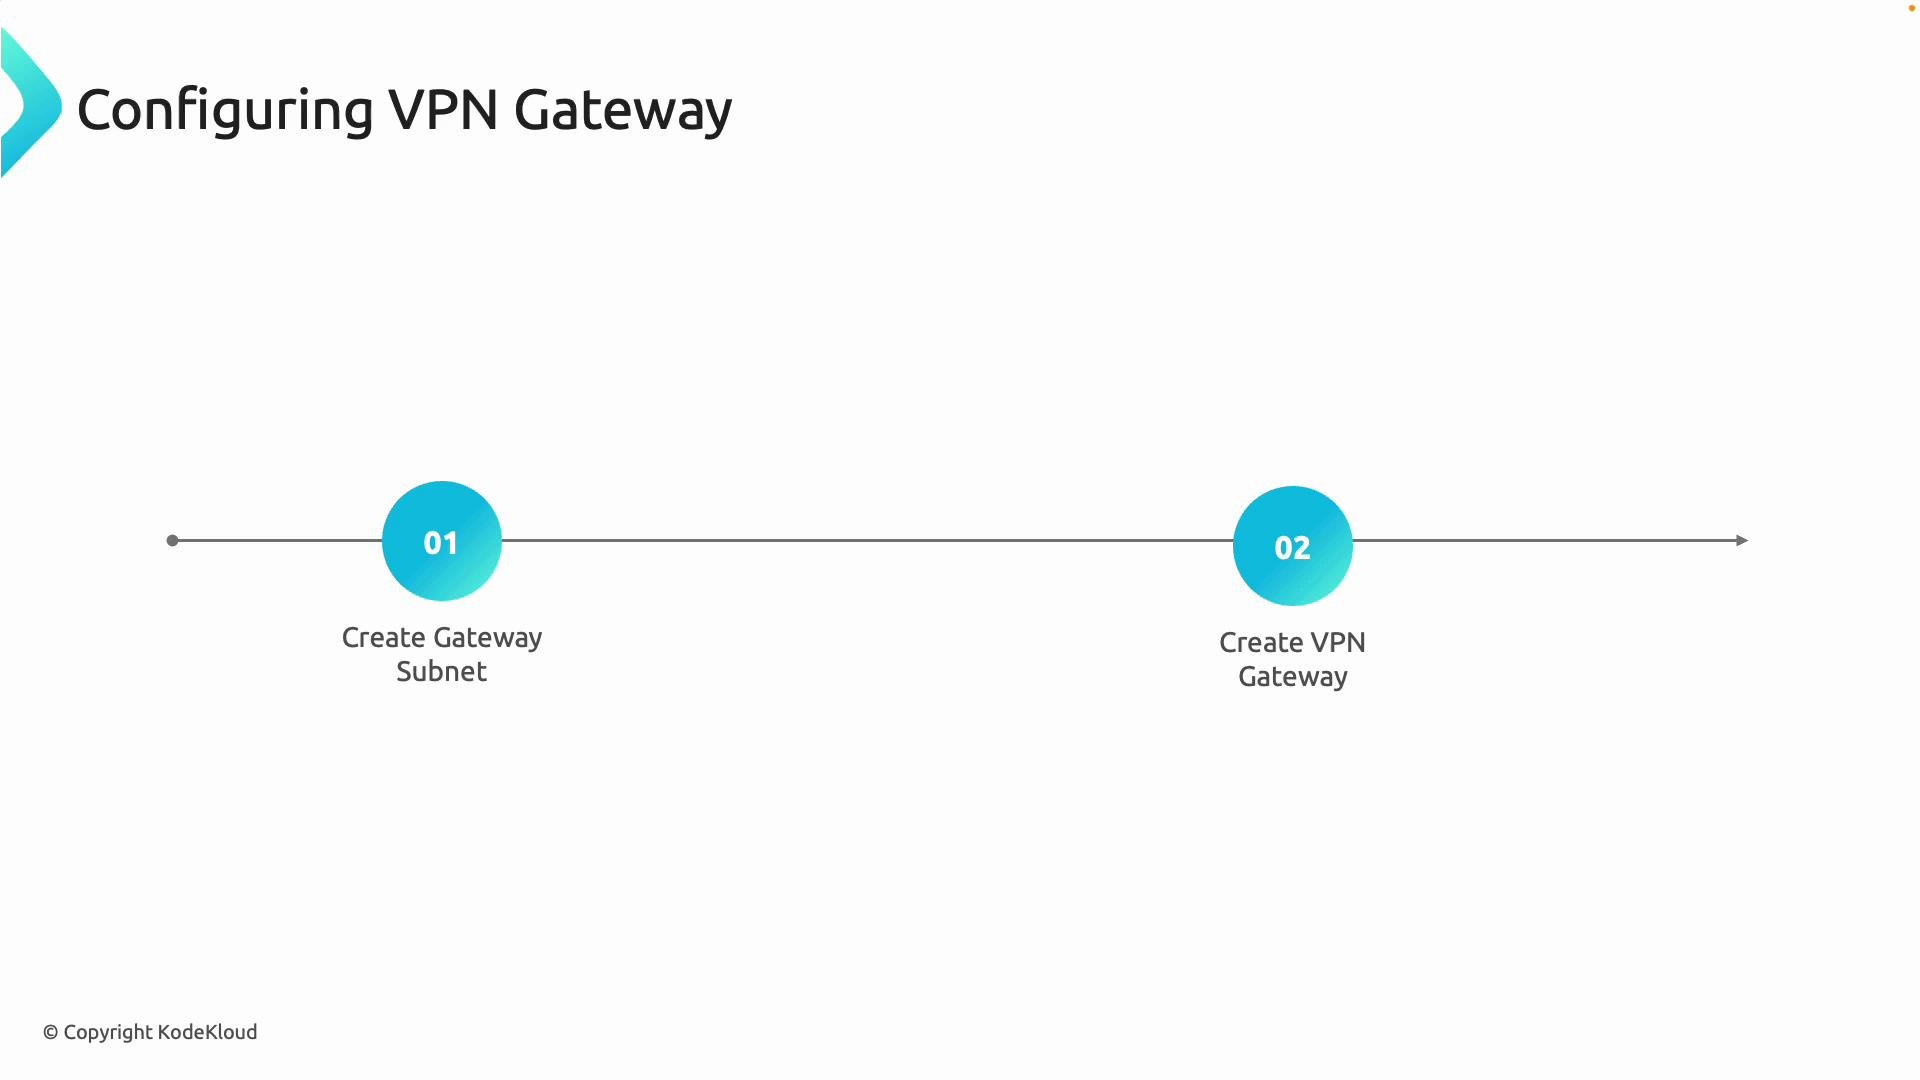
- Create a dedicated subnet named exactly
GatewaySubnetinside the virtual network where the gateway will be deployed. - Deploy the VPN gateway resource into that virtual network.
- Configure the connection type you need (site-to-site or point-to-site) and any additional settings such as BGP or active-active mode.
- Site-to-site (S2S): Create a Local Network Gateway to represent the on-premises address space and public IP, then create a Connection between the Azure VPN gateway and the Local Network Gateway.
- Point-to-site (P2S): Configure client address pools, authentication method (certificate or Azure AD), and VPN client configuration.
Start with the GatewaySubnet
The VPN gateway must be placed in a subnet named exactlyGatewaySubnet. Azure requires this exact name to allocate and configure the gateway resources. Keep this subnet dedicated to the gateway—do not deploy other workloads in it.
GatewaySubnet guidelines:
Always name the subnet exactly
GatewaySubnet. If the name is different, Azure cannot place the gateway and creation will fail.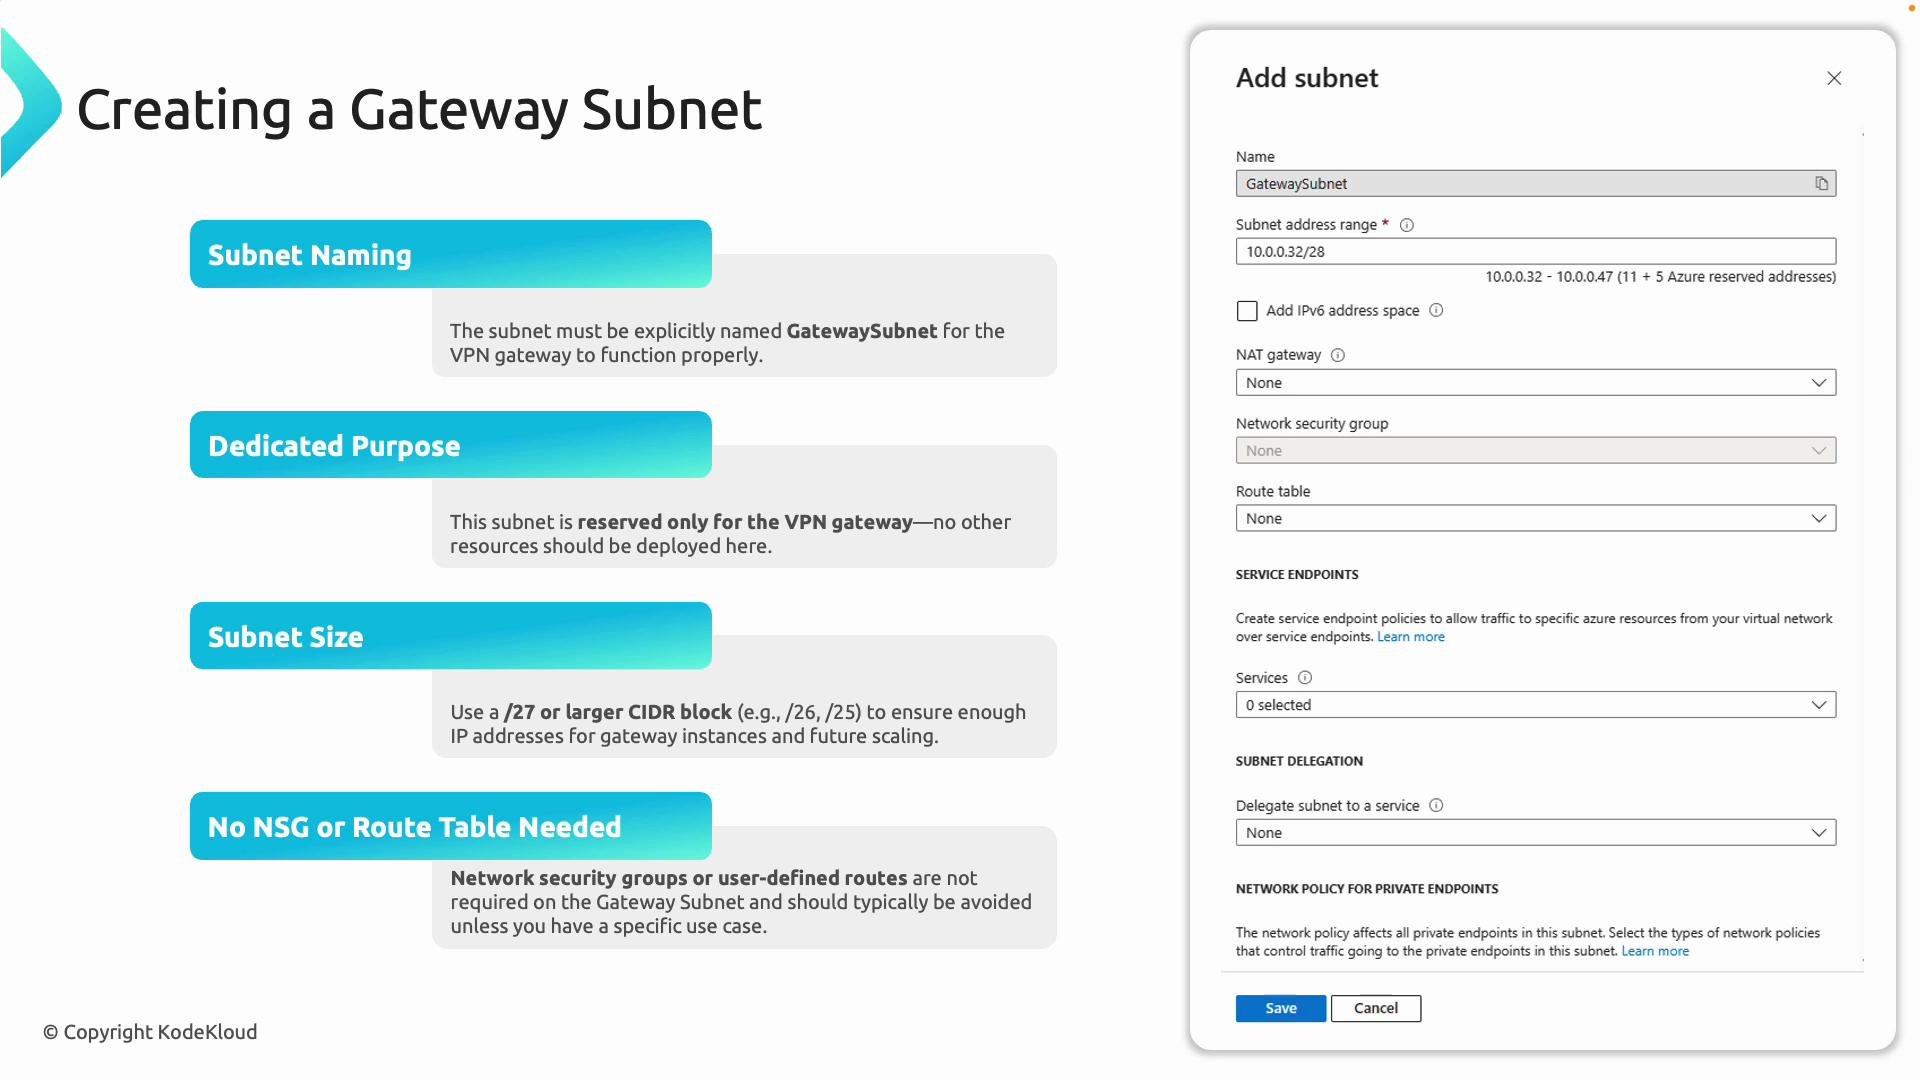
Creating the VPN gateway — options and considerations
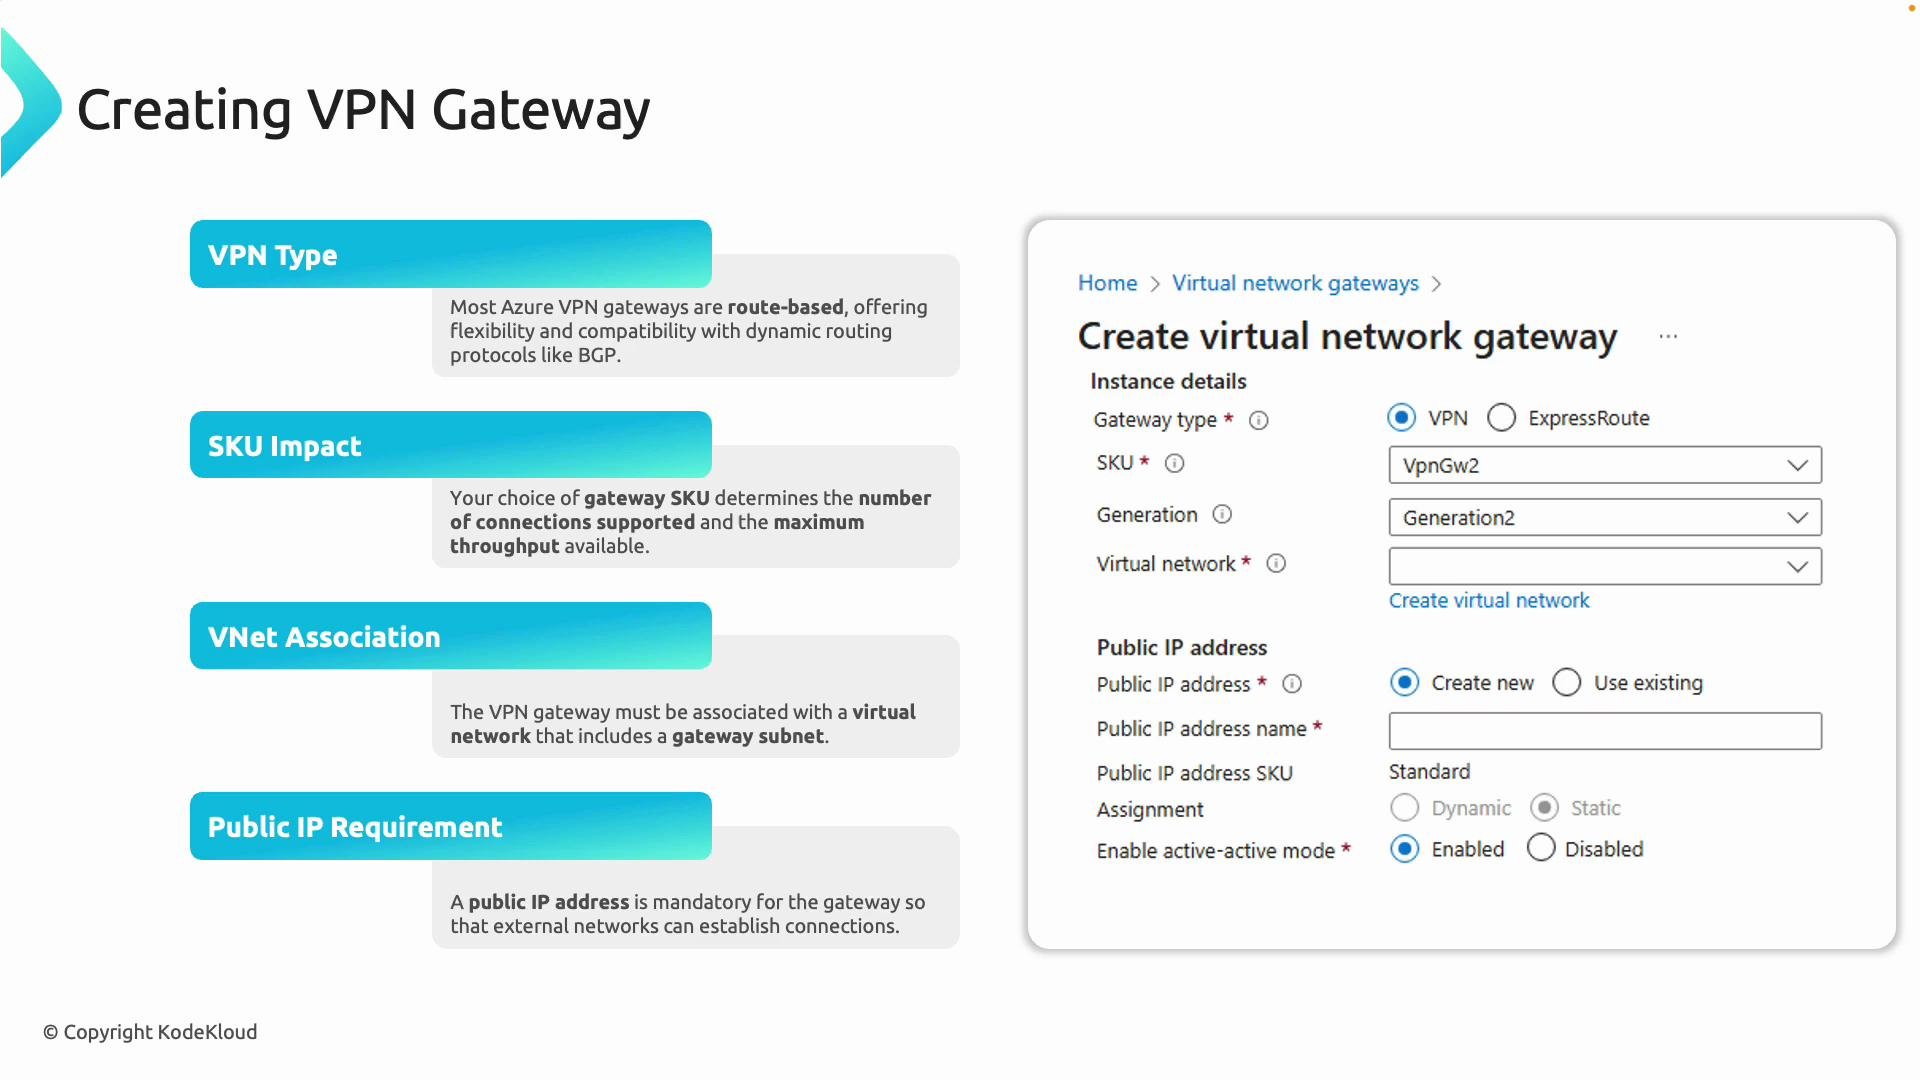
When you create the VPN gateway resource, choose options based on your topology, throughput, and feature requirements:
Notes:
- If you plan to use Azure Route Server, the VPN must be route-based. See Azure Route Server docs for integration details.
- SKU selection affects available features (for example, BGP and active-active support vary by SKU). Reference the Azure VPN Gateway SKUs documentation when choosing.
Provisioning time and deployment plan
Provisioning a virtual network gateway can take time. Plan accordingly.Creating a virtual network gateway can take up to 45 minutes. Do not retry or change configuration mid-provisioning—this can cause failures or require cleanup.
- Start gateway creation during a maintenance window.
- Avoid cancelling and recreating mid-deploy; repeated attempts may require support and cleanup.
- Monitor the Deployment in the resource group for progress and failure details.
Summary of the core steps
To deploy a VPN gateway:- Plan the hub VNet address space and reserve a
GatewaySubnet. - Create
GatewaySubnetwith at least a/27prefix and keep it dedicated. - Deploy the VPN gateway into the VNet containing the
GatewaySubnet. - Select appropriate VPN type (route-based), SKU, and public IP configuration.
- Allow provisioning time; after creation, configure S2S or P2S connections.
Practical lab example (hub-spoke topology with PowerShell)
This example creates a hub VNet (for the VPN gateway), a spoke VNet (for workloads), and a test VM in the spoke. The hub will host the gateway and be peered to the spoke to enable gateway transit. Corrected PowerShell snippet (note: use single quotes for plaintext password to avoid variable expansion):- Creates resource group, hub and spoke VNets.
- Creates a VM in the spoke (private-only).
- The intended next steps (not shown) would be: create
GatewaySubnetin the hub, deploy the VPN gateway into the hub, peer the hub and spoke VNets, and enable gateway transit so the spoke VM can route traffic via the hub gateway (for P2S or S2S testing).
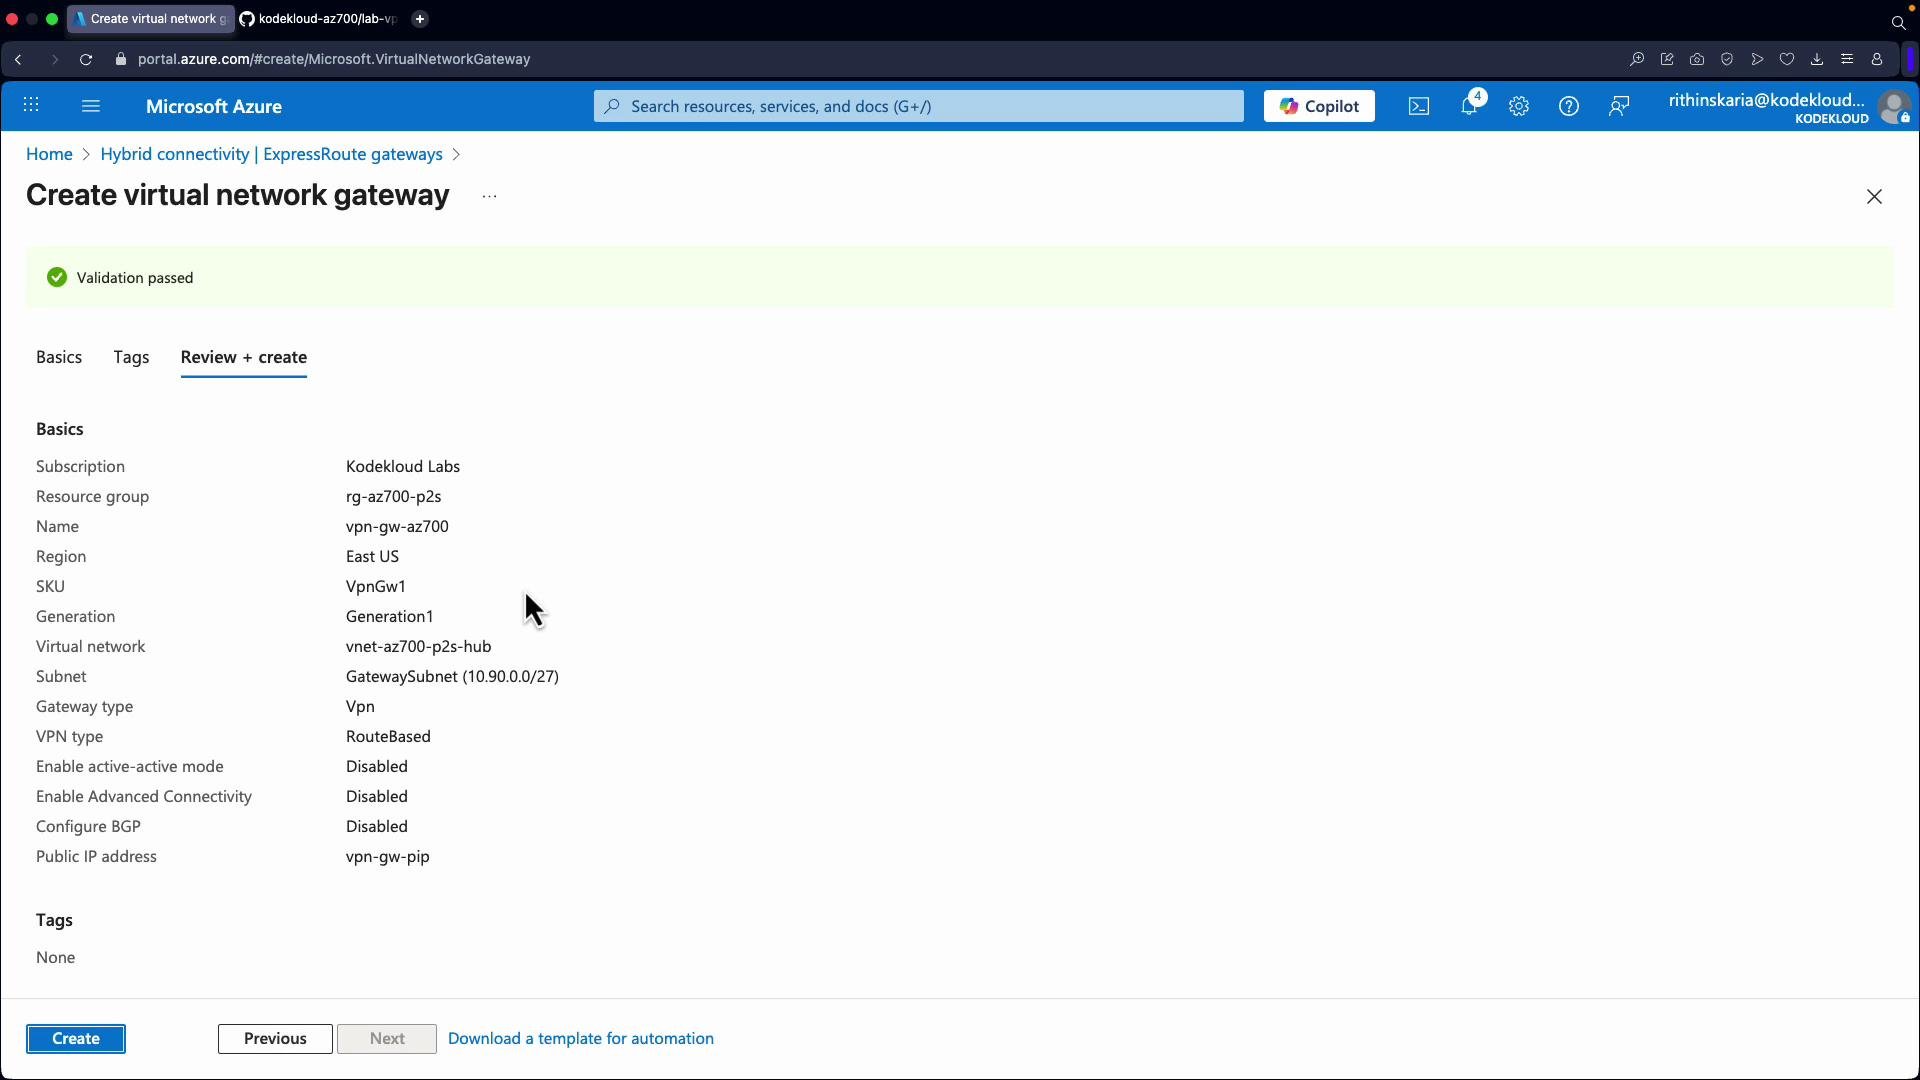
Creating a VPN gateway from the Azure portal
Steps (concise):- Search for “Virtual network gateways” and click Create.
- Choose subscription and resource group.
- Enter gateway name (e.g.,
VPN-GW-AZ700) and region (must match the VNet region). - Gateway type:
VPN. - VPN type:
Route-based. - SKU: choose appropriate SKU (e.g.,
VpnGw1for lab/testing). - Virtual network: select the hub VNet that contains
GatewaySubnet. If you haven’t createdGatewaySubnet, the portal can propose creating one, but it may allocate a large CIDR—manual creation is preferable. - Public IP address: create a new public IP resource.
- Active-active: enable only if you have matching on-premises dual-IP configuration.
- BGP: enable if you require route-based dynamic routing.
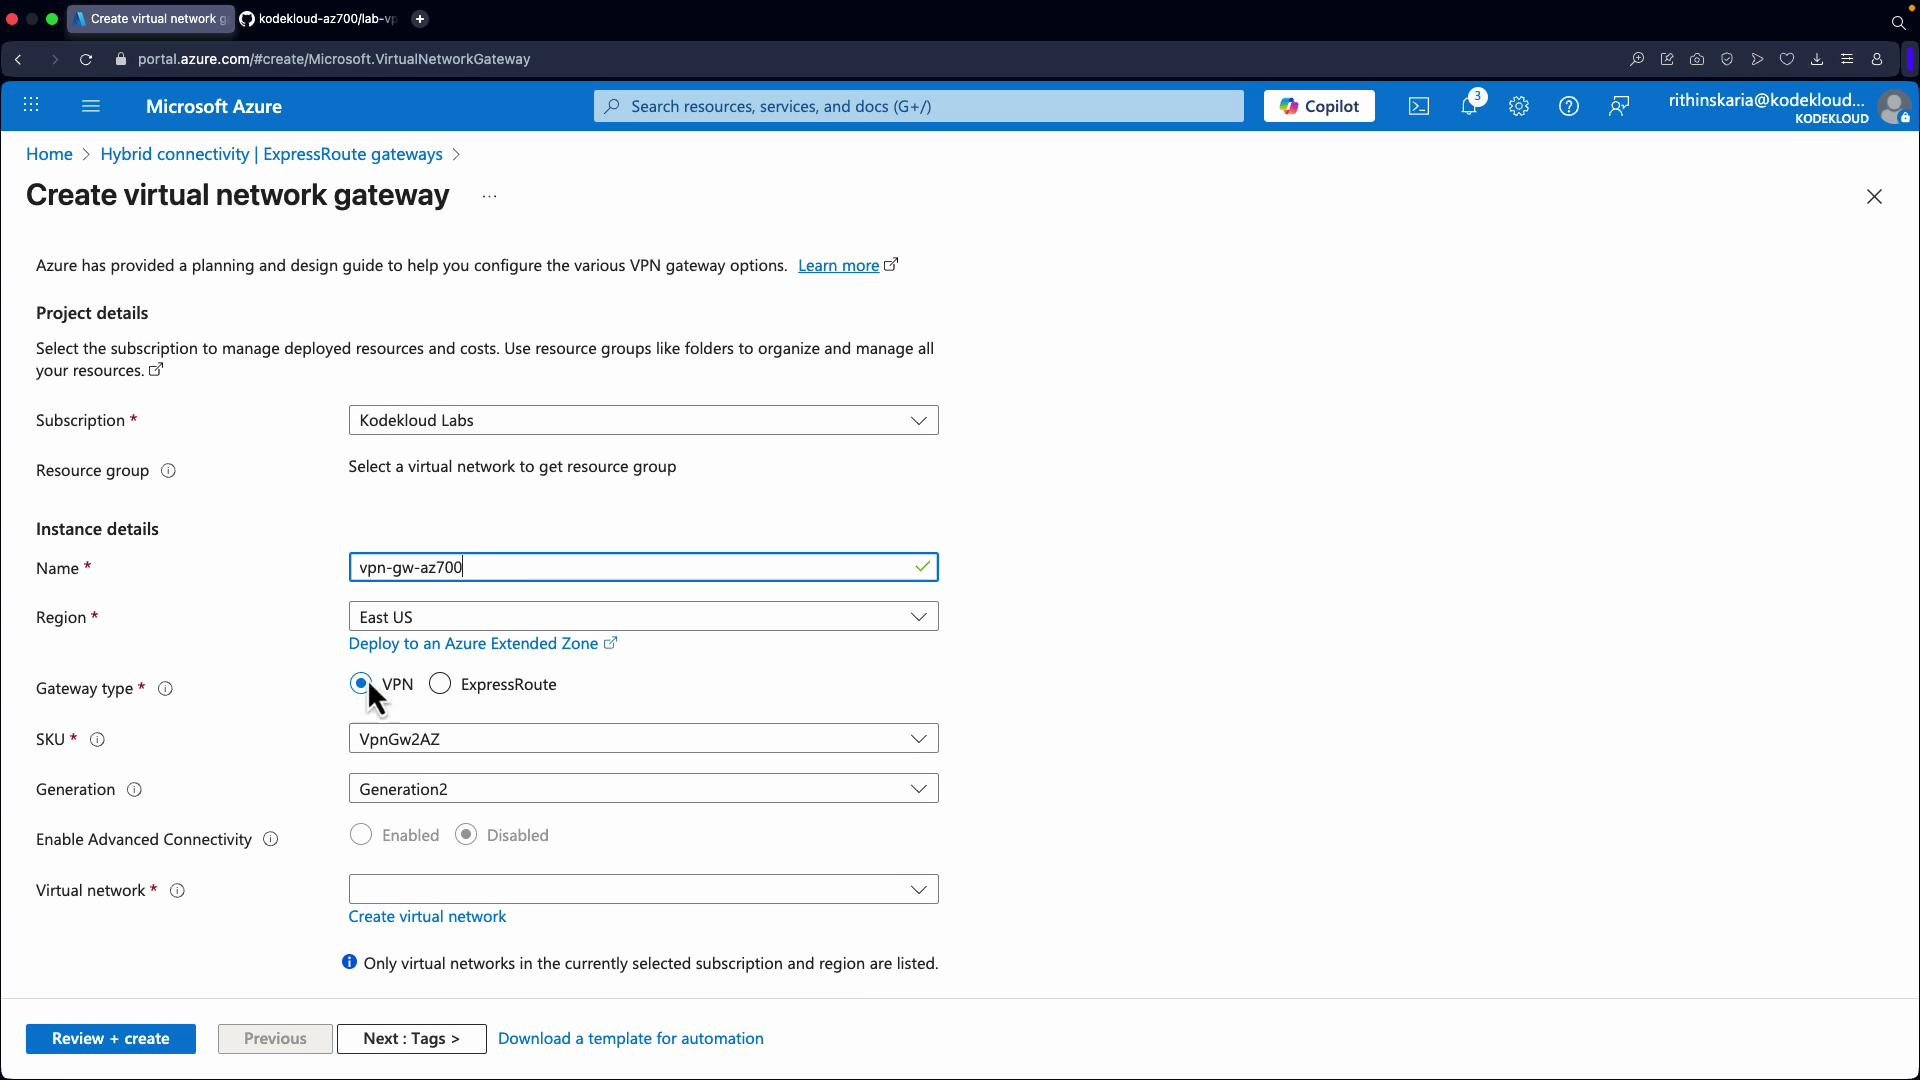
GatewaySubnet manually, the portal can create it for you. To avoid unintentionally large allocations, create the subnet in advance and use a /27 (or larger) so you preserve space for other hub services.
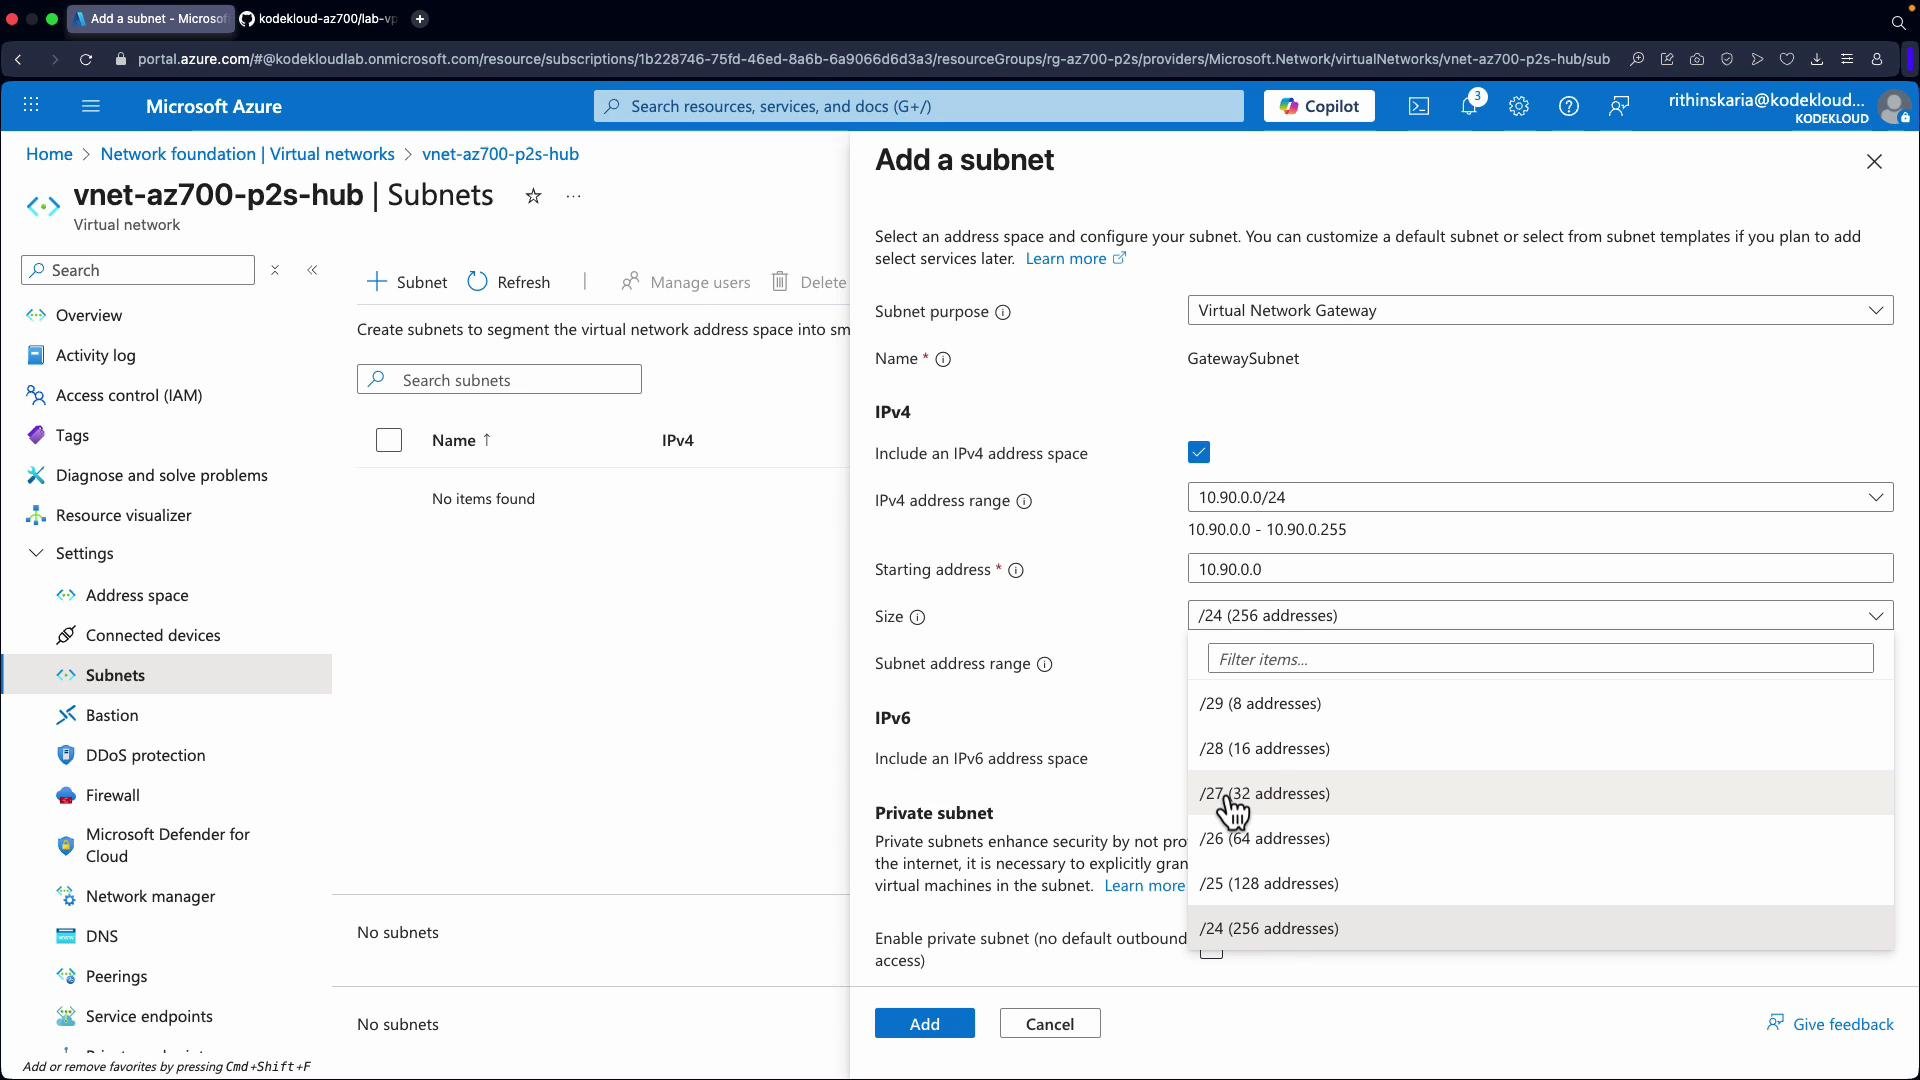
Walkthrough: add GatewaySubnet manually
- Go to the hub virtual network in the portal.
- Open Subnets -> Add.
- For the subnet name enter
GatewaySubnet(or choose Purpose = GatewaySubnet to set the name automatically). - Assign an address range (for example a
/27like10.90.0.32/27depending on your addressing). - Save the subnet.
GatewaySubnet exists, go back to Virtual Network Gateways -> Create and select the hub VNet. The portal will automatically select GatewaySubnet. Configure the remaining options (public IP, active-active, BGP, key vault for certificate auth if needed) and click Create.
Next steps after gateway provisioning
- For S2S: create a Local Network Gateway representing the on-premises public IP and address spaces, then create a Connection between the Azure VPN gateway and the Local Network Gateway. Configure on-premises device with matching shared key and tunnel parameters.
- For P2S: configure client address pool, authentication (certificates or Azure AD), and generate/download VPN client profiles for end users.
- For BGP/Route Server integration: enable route-based VPN, set device and ASN values, and configure BGP peering as needed. Refer to the Azure Route Server documentation for integration details.
- Test connectivity from on-premises devices and VPN clients to verify routes and access to Azure workloads.
- Virtual network gateways overview - Azure
- Azure VPN Gateway SKUs
- Configure point-to-site connections - Azure VPN Gateway