

- The forced tunneling architecture pattern
- Step-by-step configuration using User-Defined Routes (UDRs)
- Example Azure CLI/PowerShell commands
- Operational considerations and testing tips
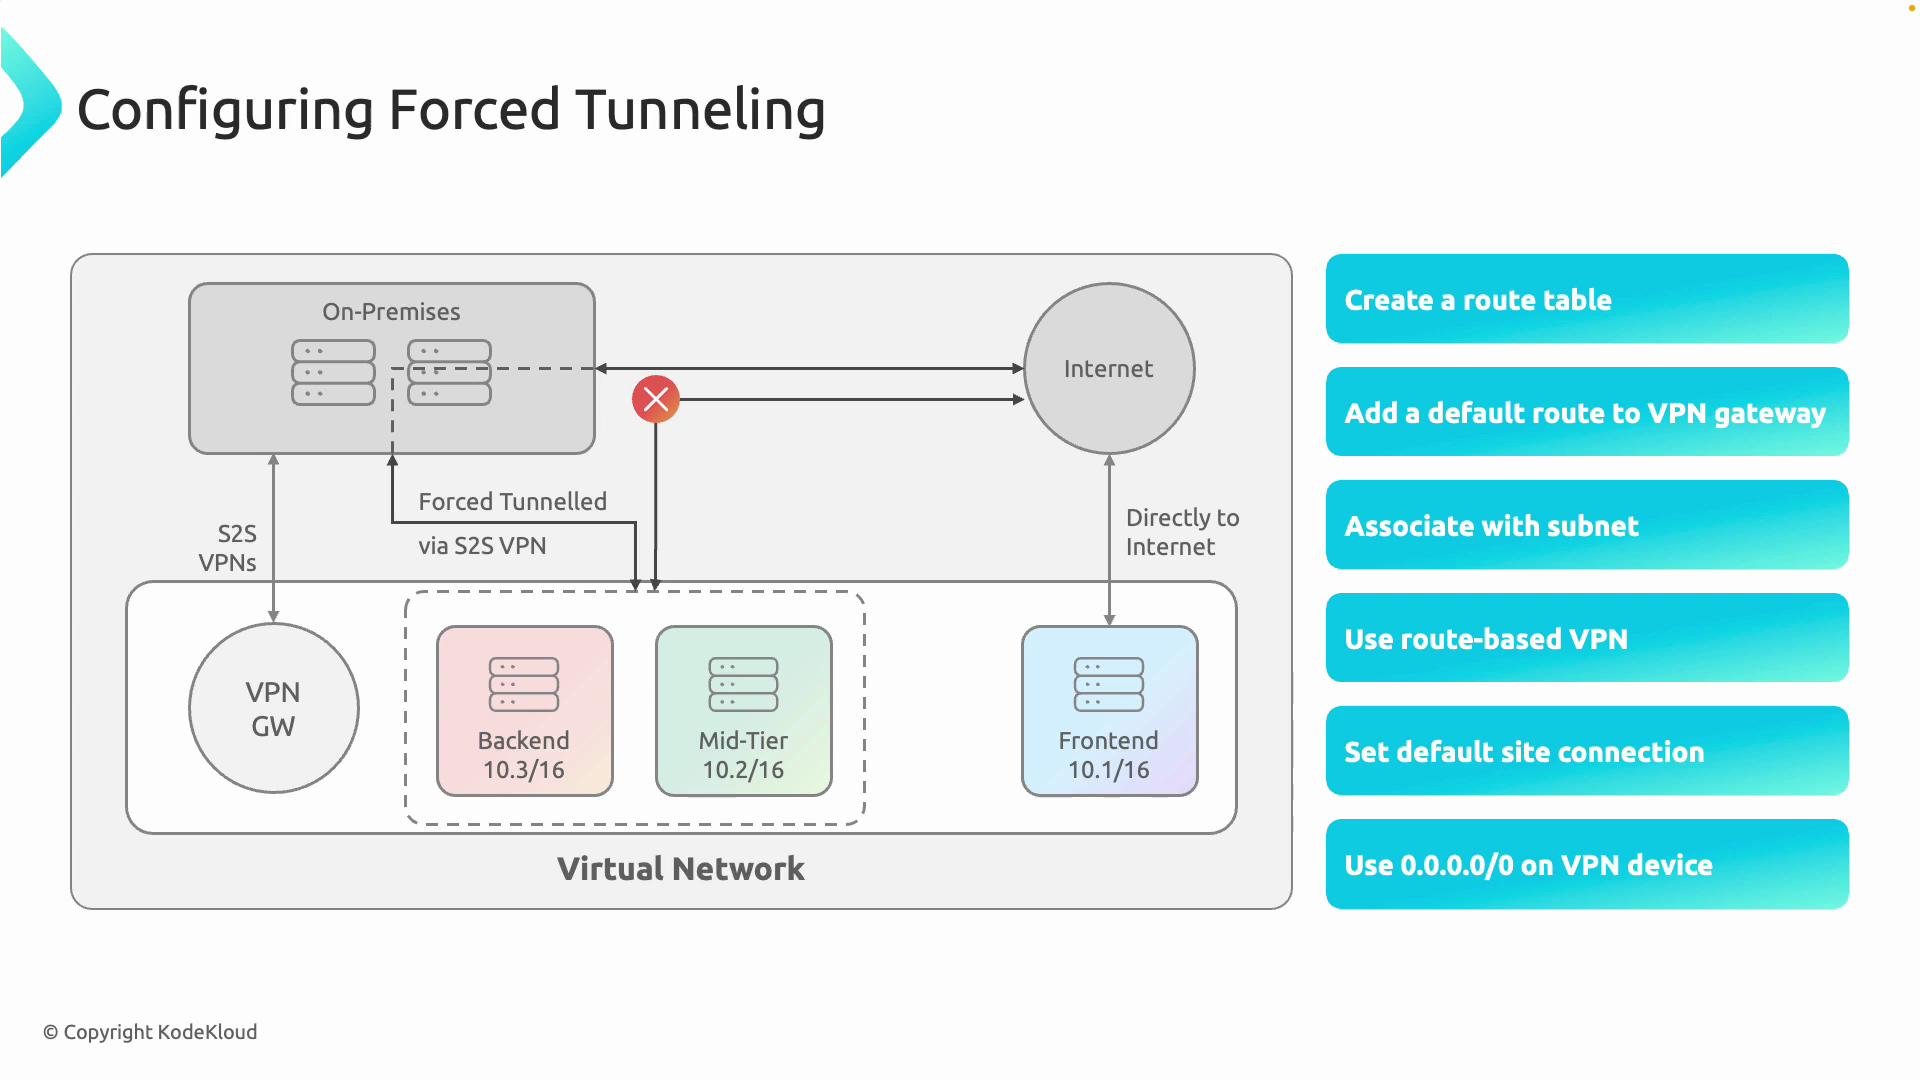
-
Create a custom route table (UDR)
- Azure provides default system routes that allow VMs to egress directly to the Internet. To override that for selected subnets, create a User-Defined Route (UDR) route table and add explicit routes.
-
Add a catch-all route that points to the Virtual Network Gateway
- Add a route with destination
0.0.0.0/0and set the next hop type toVirtualNetworkGateway. This forces Internet-bound traffic from associated subnets to the VPN gateway.
Note: Available next hop types includeVirtualNetwork,VirtualAppliance,Internet,VirtualNetworkGateway, and others. For forced tunneling chooseVirtualNetworkGateway. - Add a route with destination
-
Associate the route table with the target subnets
- Link the route table to the subnet(s) whose outbound traffic you want to force through on-premises (for example, backend and mid-tier subnets). Do not associate the UDR with the
GatewaySubnet.
- Link the route table to the subnet(s) whose outbound traffic you want to force through on-premises (for example, backend and mid-tier subnets). Do not associate the UDR with the
-
Ensure the VPN gateway is route-based
- Forced tunneling requires a route-based Virtual Network Gateway. Policy-based gateways do not support sending a
0.0.0.0/0UDR to the gateway.
How to check (Azure CLI):Make sure the Virtual Network Gateway is configured as route-based. Policy-based gateways do not support forced tunneling via a0.0.0.0/0UDR to the gateway. - Forced tunneling requires a route-based Virtual Network Gateway. Policy-based gateways do not support sending a
-
Configure the default/local network gateway and VPN connection
- In the Virtual Network Gateway settings, configure the default site (local network gateway) or the appropriate connection so Azure knows which on-premises gateway should receive Internet-bound traffic. Ensure the site-to-site connection is healthy.
-
Prepare your on-premises devices for backhaul and NAT
- On-premises VPN devices and security appliances must accept all Internet-bound traffic from Azure, perform inspection/filtering and NAT (if required), and forward traffic to the Internet. Return traffic must be routed back to on-premises so it can traverse the VPN back to Azure.
On-premises appliances will receive significantly more traffic when forced tunneling is enabled. Ensure capacity planning, correct NAT rules, and routing/backhaul for return traffic are in place; otherwise you can cause connectivity loss for Azure workloads.
Testing and validation
-
Validate route propagation:
- From a VM in an associated subnet, examine the effective routes and confirm the
0.0.0.0/0next hop is the Virtual Network Gateway. - Azure CLI to view effective routes (example for Network Interface):
- From a VM in an associated subnet, examine the effective routes and confirm the
-
Functional test:
- From a VM in a forced-tunnel subnet, initiate an outbound request (e.g.,
curl https://ifconfig.co) and confirm the public IP matches the on-premises NATed egress IP—indicating traffic was NATed on-premises. - Verify inspection logs, proxy logs, or firewall sessions on the on-premises appliances show the Azure-originated connections.
- From a VM in a forced-tunnel subnet, initiate an outbound request (e.g.,
-
Monitoring:
- Use Network Watcher flow logs and on-premises monitoring to verify traffic patterns and troubleshoot drops or asymmetric routing.
- Use forced tunneling when you require centralized inspection, logging, or egress NAT for Azure-originated Internet traffic.
- Avoid if on-premises devices lack capacity, or if the added latency and failure domain are unacceptable for specific workloads.
- Create a custom route table (UDR).
- Add a
0.0.0.0/0route with the next hopVirtualNetworkGateway. - Associate the UDR with only the subnets that require forced tunneling (never the
GatewaySubnet). - Ensure the Virtual Network Gateway is route-based and the site-to-site VPN is healthy.
- Prepare on-premises appliances to inspect, NAT, and forward traffic and to route responses back to Azure.
- Azure Virtual Network routing overview
- Forced tunneling with VPN Gateway
- Configure a site-to-site VPN connection in Azure